RobMeade
Bronze Level Poster
Hi all,
So, I'm hoping someone may be able to advise.
I have a Octane Series: 17.3" Matte Full HD 144Hz 72% NTSC LED Widescreen (1920x1080) + G-Sync, ordered from PC Specialist in 2020.
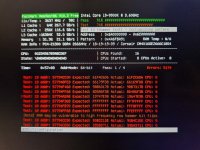
For the last few days I've been starting to get some BSOD.. ran a Windows Memory Diagnostics check earlier and it advised that there was a hardware problem.
Installed some other somewhere, MemSomething86 I think it was called (can't check as laptop currently screwed). That also reported lots of errors (it gave up after reaching 10000).
I have 2 memory sticks in the laptop, but I didn't know which one, or whether both, were faulty.
I figured if I opened it up, took one out, ran the test again, and then swap them Iver and repeat, I might be able to establish which stick was problematic.
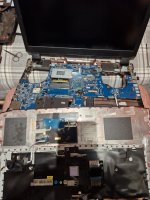
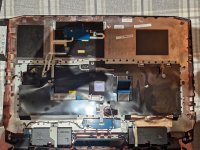
Opening the back of the laptop inbound RAM3 and RAM4 slots, but no RAM1 and RAM2 slots.
I removed some more screws and eventually found them to be on the flip side, effectively directly under the keyboard. I was able to remove one.
And now for the problem.
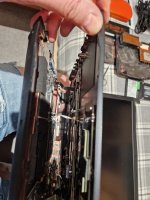
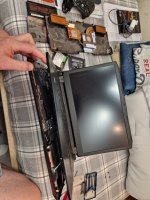
There are about 6 SHORT cables that attach the upper part of the frame (with the keyboard) to the bottom part of the frame, connecting to the motherboard. These are very short cables and I cannot for the life of me see how, when holding the two pieces together I can get my hand between to reattach them. I can't imagine how anyone did in the first place.
So, I was wondering if anyone else has done something similar and has any advice for getting it back together. I needed the laptop for a meeting tomorrow which is now screwed, but I tend to use this every day for my entire life, work, leisure, everything, so it's quite important/urgent.
I am considering sending it back to PC Specialist, despite the warranty running out in Feb, but hoping to avoid a lengthy turn around if it's something I can resolve myself.
Any suggestions would be gratefully received.
So, I'm hoping someone may be able to advise.
I have a Octane Series: 17.3" Matte Full HD 144Hz 72% NTSC LED Widescreen (1920x1080) + G-Sync, ordered from PC Specialist in 2020.
For the last few days I've been starting to get some BSOD.. ran a Windows Memory Diagnostics check earlier and it advised that there was a hardware problem.
Installed some other somewhere, MemSomething86 I think it was called (can't check as laptop currently screwed). That also reported lots of errors (it gave up after reaching 10000).
I have 2 memory sticks in the laptop, but I didn't know which one, or whether both, were faulty.
I figured if I opened it up, took one out, ran the test again, and then swap them Iver and repeat, I might be able to establish which stick was problematic.
Opening the back of the laptop inbound RAM3 and RAM4 slots, but no RAM1 and RAM2 slots.
I removed some more screws and eventually found them to be on the flip side, effectively directly under the keyboard. I was able to remove one.
And now for the problem.
There are about 6 SHORT cables that attach the upper part of the frame (with the keyboard) to the bottom part of the frame, connecting to the motherboard. These are very short cables and I cannot for the life of me see how, when holding the two pieces together I can get my hand between to reattach them. I can't imagine how anyone did in the first place.
So, I was wondering if anyone else has done something similar and has any advice for getting it back together. I needed the laptop for a meeting tomorrow which is now screwed, but I tend to use this every day for my entire life, work, leisure, everything, so it's quite important/urgent.
I am considering sending it back to PC Specialist, despite the warranty running out in Feb, but hoping to avoid a lengthy turn around if it's something I can resolve myself.
Any suggestions would be gratefully received.
")